
To build a DIY solar still, you’ll need simple materials like plastic or glass sheets, containers, and sealants. Position the basin where it gets plenty of sunlight, and create a cover to facilitate condensation. Make certain all parts are securely sealed and aligned for maximum efficiency. Regular maintenance helps keep the system running smoothly. Want to discover step-by-step details to set up your own solar still? Keep exploring to get all the tips and tricks.
Key Takeaways
- Use transparent materials like glass or plastic sheets to cover the basin, maximizing sunlight absorption and condensation efficiency.
- Select a suitable basin for contaminated water, ensuring it’s sealed and positioned for optimal exposure to sunlight.
- Incorporate a tilted cover angled towards the collection trough to direct condensed water into a clean storage container.
- Seal all joints with waterproof sealant to prevent leaks and maintain system integrity during operation.
- Place the solar still in a sunny location with minimal wind and debris to enhance evaporation and condensation processes.
Understanding How a Solar Still Works

A solar still works by using the energy from the sun to evaporate dirty or salty water, leaving impurities behind. When sunlight hits the water’s surface, it heats up, causing water molecules to turn into vapor. This process harnesses solar energy for water purification, transforming contaminated water into fresh, drinkable water. The vapor rises and then condenses on a cool surface, such as a clear plastic or glass cover. As it cools, the condensed water drips into a collection trough. This simple yet effective method mimics the natural water cycle, providing clean water without chemicals or electricity. Understanding the contrast ratio helps in appreciating how the clarity and depth of the purified water can be visually assessed and enhanced. By understanding how a solar still works, you can better appreciate its role in sustainable water purification, especially in remote or emergency situations.
Gathering Materials and Tools Needed

To build an effective solar still, you’ll need to gather specific materials and tools. Using recycling materials, like an old glass or plastic container, can help reduce the solar still cost and make your project more eco-friendly. You’ll also need clear plastic or glass sheets to cover the still, a small container for collecting distilled water, and a sturdy base to hold everything in place. A knife or scissors will help you cut the materials to size, while a drill can assist with making holes for drainage or securing parts. A waterproof sealant is vital to prevent leaks. Gathering these items beforehand ensures your DIY solar still is efficient and budget-friendly, making it easier to start your freshwater extraction project. Additionally, selecting appropriate materials and features can greatly enhance the overall effectiveness of your solar still.
Designing Your Solar Still Layout

When designing your solar still layout, focus on placing materials where they can maximize sunlight absorption and condensation. Position your containers carefully to guarantee efficient collection and easy access for maintenance. Thinking about ideal material placement and container positioning now helps you create a more effective and reliable solar still. Additionally, selecting appropriate spray tips can ensure the materials used are compatible with your setup and maximize efficiency.
Optimal Material Placement
Optimizing the placement of materials in your solar still is essential for maximizing water collection efficiency. Start by paying attention to material spacing; keep the basin and cover close enough to create a strong greenhouse effect but spaced to prevent heat loss. Proper cover alignment ensures sunlight enters directly onto the water surface, promoting evaporation. Make sure the cover is angled correctly to direct condensed water toward your collection trough. Avoid gaps or uneven placement, as these can reduce condensation or cause leaks. Use consistent spacing to maintain even heating and condensation across the surface. Additionally, considering thermal insulation can help trap heat more effectively, further improving efficiency. By carefully arranging your materials with proper spacing and cover alignment, you’ll improve overall efficiency and collect more freshwater from your solar still.
Effective Container Positioning
Positioning your containers effectively is essential for capturing the maximum amount of distilled water. Proper container orientation ensures sunlight hits the water surface directly, boosting evaporation. Additionally, lid placement plays a key role; a well-placed lid directs condensation toward the collection point. Consider the following layout:
| Container Orientation | Lid Placement | Water Collection Efficiency |
|---|---|---|
| Face sunward | Slightly angled | Maximizes condensation flow |
| Parallel to sunlight | Flat on top | Prevents water loss |
| Angled for runoff | Tight seal | Improves water collection |
Align containers to face the sun, angle lids for ideal condensation, and seal well to prevent vapor escape. This setup enhances your solar still’s performance, ensuring you gather the most water possible.
Building the Basin for Saltwater or Contaminated Water

To effectively collect distilled water, you need to build a sturdy basin that can hold saltwater or contaminated water safely. Start by choosing the right basin material, such as food-grade plastic or metal, to prevent contamination. Consider basin size carefully; it should be large enough to hold sufficient water but not so big that it’s difficult to manage or causes instability. Verify the basin’s edges are smooth to avoid leaks and spills. Using appropriate materials can help ensure the longevity and safety of your solar still.
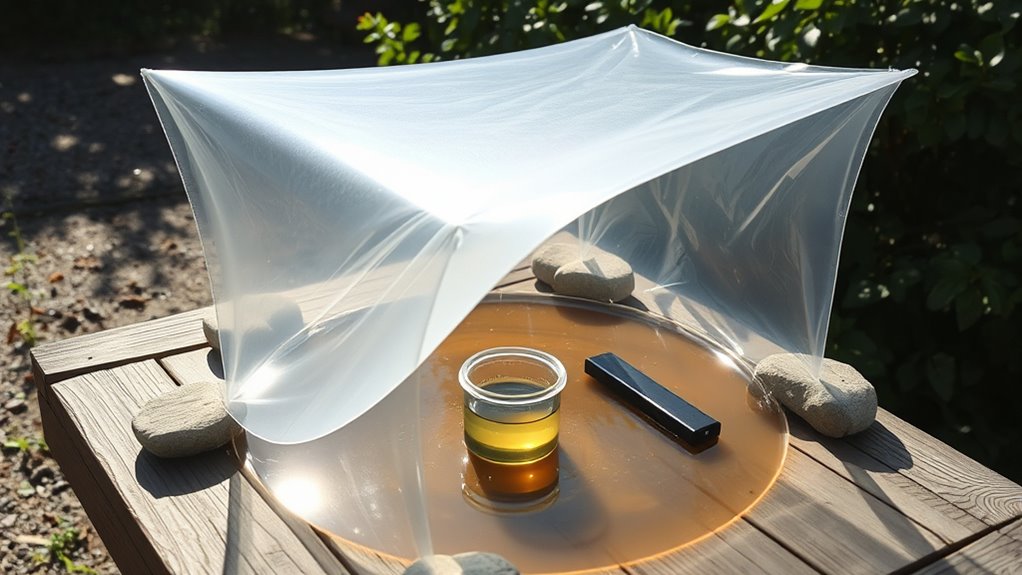
Creating the Condensation Cover

Once you’ve set up your basin, the next step is creating a condensation cover that captures the purified water as it forms. Your condensation cover design should maximize surface area for condensation and direct the water toward a collection point. When selecting cover material, choose something transparent and durable, like clear acrylic or glass, to let sunlight pass through efficiently. Make certain the cover fits snugly over the basin to prevent vapor from escaping. You can create a slight incline on one side to channel the condensed water into a collection trough or container. Keep the surface clean and free of debris to optimize condensation. A well-designed cover with the right materials is essential for efficient water collection in your solar still. Additionally, ensuring proper ventilation can improve the efficiency of condensation and water collection.
Assembling the Solar Still Components

Assembling the solar still components involves carefully connecting each part to guarantee efficient water collection. Start by attaching the condensation cover securely to the base, ensuring a tight seal. Next, integrate the solar panel into the weatherproof housing to protect it from the elements and optimize energy absorption. Proper solar panel integration is vital for powering any included pumps or lighting. Make sure the housing is sealed properly to prevent water ingress and damage. Use waterproof connectors and sealants where necessary, and double-check all connections for stability. This careful assembly ensures your solar still functions effectively and lasts longer. Additionally, verifying the seal integrity of all joints helps maintain optimal performance and prevents leaks.
Positioning and Installing Your Solar Still

To get the best results, place your solar still where it will receive maximum sunlight throughout the day. Make sure it’s secured firmly to withstand wind or accidental bumps. Proper positioning and stable installation guarantee efficient water collection and safety during use.
Optimal Placement Strategies
Proper placement is crucial to maximizing your solar still’s efficiency, so it’s important to choose a spot that receives ample sunlight throughout the day. Avoid shade placement, which can considerably reduce evaporation. Position your still where it’s exposed to direct sunlight for at least 6 hours daily. Be mindful of wind direction, as strong gusts can disrupt the still’s operation or cause instability. Consider placing it on a level surface to prevent leaks and ensure ideal water collection. Additionally, select a location away from dust or debris, which can contaminate the water. Keep in mind that positioning near natural windbreaks can help reduce wind impact while still allowing sunlight to reach the still effectively. Proper placement ensures maximum efficiency and easier maintenance. Incorporating insights from AI security research, such as robust safety measures, can also help protect your setup from unforeseen environmental factors.
Secure Installation Tips
Ensuring your solar still is securely installed is essential for safe and efficient operation. Start by choosing a stable, level surface that can support the weight of the still and withstand weather conditions. Use sturdy mounting brackets or secure anchors to prevent movement or tipping. Incorporate security measures like straps or tie-downs if you’re installing outdoors or in windy areas. Make sure all connections are tight and stable to avoid leaks or accidents. Keep the installation area clear of obstructions and hazards to maintain installation safety. Regularly check the setup for signs of wear or instability, especially after adverse weather. Properly securing your solar still not only protects your investment but also ensures consistent freshwater production and safe, reliable use over time. Understanding industry trends can help you stay informed about optimal installation practices and equipment updates.
Collecting and Storing Fresh Water

Collecting and storing fresh water is a crucial step in making your DIY solar still effective. After condensation occurs, you need a clean method to collect and store your water safely. Use a clean container to prevent contamination, and consider water filtration before drinking. Rainwater harvesting can supplement your supply, especially during rainy periods. Make sure your storage containers are sealed and kept in a cool, dark place to prevent algae growth and spoilage. Regularly check your collection system for leaks or debris. Proper storage ensures your freshwater remains pure and ready for use when needed. Additionally, using appropriate storage materials helps maintain water quality and prevents chemical leaching. Proper storage ensures your freshwater remains pure and ready for use when needed. Remember, clean collection methods and good storage habits are essential for maintaining a safe freshwater supply from your solar still.
Optimizing Efficiency and Performance

To maximize the efficiency and performance of your DIY solar still, focus on optimizing key factors that influence condensation and water collection. Position your solar panel to capture maximum sunlight, ensuring it powers any auxiliary components effectively. Proper insulation of the still minimizes heat loss, boosting water vapor production. Use reflective surfaces around the still to direct more sunlight onto the evaporation area. Keep the water level consistent to promote steady condensation. Enhancing insulation and sunlight exposure improves water purification, resulting in cleaner, more abundant freshwater. Regularly check for leaks or blockages that could hinder condensation. By refining these factors, you’ll increase water yield, making your solar still more efficient and reliable for freshwater extraction.
Maintenance and Troubleshooting Tips

Regular maintenance is essential to keep your DIY solar still functioning efficiently. Regularly cleaning filters ensures maximum airflow and prevents buildup that could reduce water production. Check your filters often and wash them with clean water to maintain their effectiveness. If your solar still uses batteries, monitor their condition and replace them when they show signs of decline to keep the system running smoothly. Troubleshooting common issues can save you time; for example, if water isn’t collecting, inspect for cracks or blockages in the basin. Also, verify that the collector surface is clean and free of debris. Regular upkeep prevents minor problems from escalating, ensuring your solar still operates at peak performance and provides fresh water reliably.
Frequently Asked Questions
How Long Does It Take to Produce a Liter of Water?
The time to produce a liter of water varies based on your water collection methods and solar still maintenance. Typically, a well-maintained solar still can generate about 0.5 to 1 liter per day in ideal sunlight. Factors like sunlight intensity, still size, and cleanliness affect this. To maximize output, guarantee your solar still stays clean and positioned properly. Regular maintenance helps improve efficiency and faster water collection.
Can I Use Contaminated Water Safely in My Solar Still?
You shouldn’t use contaminated water directly in your solar still because of contamination risks. Solar stills improve water purification by removing salts and impurities, but they may not eliminate all pathogens if the water is heavily polluted. To guarantee safety, pre-treat contaminated water through boiling or chemical disinfection before use. This extra step helps protect you from potential health hazards and produces safer, cleaner freshwater.
What Is the Lifespan of a DIY Solar Still?
You wonder about your DIY solar still’s lifespan. Its durability expectations depend on materials used and environmental conditions; typically, it lasts a few years with proper care. Regular maintenance, like cleaning glass surfaces and checking seals, helps extend its life. You should expect some wear and tear over time, but with careful upkeep, your solar still can reliably produce freshwater for multiple seasons.
How Much Sunlight Is Needed for Optimal Water Yield?
You need ample sunlight for ideal water yield, so focus on solar intensity and sunlight duration. Ideally, your setup should receive direct sunlight for at least 6 hours daily, especially during peak hours when solar intensity is highest. More sunlight increases evaporation, boosting freshwater collection. Keep your solar still in a sunny spot, free from shadows, and aim for consistent sunlight exposure to maximize water production efficiently.
Are There Safety Concerns When Building or Operating a Solar Still?
Think of safety as your guiding star—ignoring it risks disaster. When building or operating a solar still, you should be cautious of chemical hazards from any materials used and guarantee electrical safety if you incorporate lights or fans. Always handle components carefully, avoid leaks, and keep flammable substances away. By prioritizing safety, you protect yourself and ensure your solar still functions effectively for fresh water.
Conclusion
Now that you’ve built your solar still, imagine the endless possibilities of fresh water right at your fingertips. Will your design maximize efficiency when faced with changing weather? As you fine-tune your setup, unexpected challenges might arise—are you ready to troubleshoot and adapt? The secrets to sustained success lie in your hands. Keep experimenting, stay curious, and watch how your solar still transforms your access to clean water—your journey has only just begun.