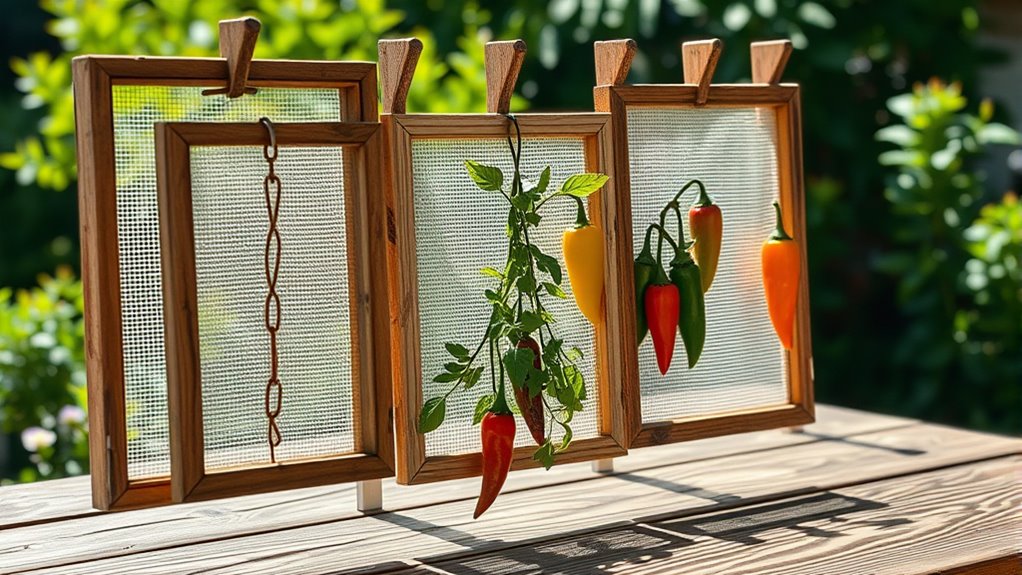

To create DIY drying racks with screen frames for sun-drying, gather sturdy wooden slats, screen mesh, hooks, screws, and basic tools. Cut the wood into your desired shape, then assemble and attach the screen securely to form a flat surface. Install hooks for easy hanging from beams or posts, and adjust their position for ideal sunlight. With customizable options, you can build efficient racks that save energy and space—learn more about designing your perfect outdoor drying solution.
Key Takeaways
- Use sturdy wooden slats to build a rectangular frame for durability and rustic appeal.
- Attach screen mesh securely with staples or nails to create an effective drying surface.
- Incorporate small holes along edges to attach hanging hooks for flexible suspension options.
- Install hooks on beams, posts, or fixtures to suspend racks and optimize sunlight exposure.
- Customize the size and number of racks to suit your outdoor space and drying capacity.

Ever wondered how to save space and money while drying your clothes? Building your own DIY drying rack with screen frames is a smart way to reclaim your laundry routine. It’s straightforward, cost-effective, and puts you in control of your drying space. Plus, it’s a liberating way to harness the sun’s power to dry your clothes naturally. You don’t need fancy equipment—just some basic materials, a bit of know-how, and the desire to take charge of your laundry process.
Start by gathering your materials: sturdy wooden slats, some screen mesh, hanging hooks, and basic tools like a saw, drill, and screws. Wooden slats serve as the frame’s backbone, providing stability and structure. They’re lightweight but durable enough to withstand outdoor conditions. The screen mesh will act as the drying surface, letting air and sunlight pass through while supporting your clothes. Hanging hooks are essential for suspending your homemade drying racks in strategic spots—like a sunny balcony or backyard. They give you the flexibility to hang multiple racks or reposition them depending on sunlight and wind.
Gather wooden slats, screen mesh, hooks, and basic tools to create your own eco-friendly drying rack.
Constructing the frame is simple. Cut the wooden slats to size, creating a rectangular shape that fits your space. Secure the slats together using screws and a drill, ensuring the frame is sturdy. Attach the screen mesh to the frame with staples or small nails, creating a flat surface for hanging clothes. If you want added versatility, incorporate small holes along the edges of the frame to attach hanging hooks. These hooks will enable you to hang your DIY drying rack from existing fixtures or create a portable setup you can move around freely.
Once assembled, install the hanging hooks in strategic locations. You might suspend your drying rack from a sturdy beam, a porch ceiling, or a freestanding post. The beauty of this setup is its flexibility—you can add more racks or reposition them based on weather conditions or your needs. The wooden slats provide a rustic charm and durability, while the screen mesh ensures your clothes dry evenly and efficiently under the sun and breeze. Additionally, utilizing electric power for drying can be costly and energy-consuming, so this sun-drying method is an eco-friendly alternative.
This DIY project not only saves money but gives you a sense of liberation by empowering you to manage your laundry on your terms. No more waiting around for electric dryers or cramming into crowded laundromats. Instead, you harness nature’s elements with a simple, customizable drying rack that’s as eco-friendly as it is practical. So, grab those wooden slats, some hanging hooks, and start building a sun-drying system that works for you—freeing your laundry routine from unnecessary constraints.

TECHTONGDA Screen Frame Drying Rack Drainer Rack for Silk Screen Printing Frame Holder Width Adjustable
[Application]-The Dry Rack is used to drip-dry screen frames after being washed or used as a storege rack…
As an affiliate, we earn on qualifying purchases.
As an affiliate, we earn on qualifying purchases.
Frequently Asked Questions
What Materials Are Best for DIY Screen Frames?
You should choose lightweight, durable materials for your DIY screen frames, like aluminum or PVC, which make frame construction easy and portable. When selecting mesh, opt for polyester or nylon screens, as they resist UV damage and provide good airflow. This way, you’ll create a sun-drying rack that’s both functional and liberating, giving you the freedom to dry herbs or produce outdoors effortlessly, without heavy or complicated materials weighing you down.
How Do I Prevent Mold on Drying Racks?
Think of mold as a sneaky villain hiding in your drying routine. To prevent mold, keep your rack in a sunny spot where the light can banish dampness. Regularly clean and dry the screen frames, and make certain good airflow to keep moisture at bay. Proper drying rack maintenance is your shield, freeing you from mold’s grip and turning your sun-drying into a fresh, worry-free adventure.
Can DIY Racks Handle Heavy or Dense Items?
DIY racks can handle heavy or dense items if you choose the right materials and design for weight capacity and durability. Using sturdy materials like thick wood or metal and reinforcing joints guarantees your rack won’t collapse under weight. By customizing the size and structure, you gain the freedom to dry bulky or heavy items without worry. Just remember, a well-built rack means more liberation and less frustration during your sun-drying projects.
How Long Does It Take to Dry Different Foods?
Drying times vary depending on the food and conditions, but generally, fruit preservation takes anywhere from a few hours to a few days. Thin slices dry faster, often within 8-12 hours, while thicker pieces may need 24-48 hours. Sun-drying on your DIY racks lets you reclaim your kitchen freedom, giving you control over your food’s preservation process. Embrace the sun, cut your drying time, and enjoy homemade, sun-dried delights.
Are There Eco-Friendly Options for Making Drying Racks?
You can definitely go green by recycling plastic to craft eco-friendly drying racks or choose bamboo alternatives to keep things sustainable. Don’t let the grass be greener on the other side; these options free you from harmful chemicals and waste. With a little creativity, you’ll discover a world where your sun-drying process is eco-conscious and liberates you from environmental guilt. It’s your chance to make a difference, one rack at a time.

JAUREE 79 Inches Clothes Drying Rack, Drying Rack Clothing Folding Indoor Outdoor, Heavy Duty Stainless Steel Laundry Rack, Foldable Portable Large Clothes Rack Garment Rack with 20 Windproof Hooks
Why You Need JAUREE Laundry Drying Rack: For crease-free clothes, the JAUREE clothing drying rack is a great…
As an affiliate, we earn on qualifying purchases.
As an affiliate, we earn on qualifying purchases.
Conclusion
Now, picture yourself placing freshly washed herbs or vibrant slices of fruit onto your homemade screen frame drying rack. As the sunlight filters through, casting gentle shadows, you’ll feel a satisfying connection to the simple art of preservation. The breeze whispers softly, carrying away moisture, while the rack holds your treasures like a silent guardian. With each use, you create not just dried goods, but a warm, sun-kissed ritual that turns everyday moments into a peaceful dance with nature.

HOME IT Wooden Clothes Drying Rack for Laundry – Collapsible Folding Bamboo Laundry Drying Rack for Drying Clothes – Heavy Duty Pre Assembled
laundry rack portable clothes rack Lightweight and easy to drop into position for use; cloth drying rack folds…
As an affiliate, we earn on qualifying purchases.
As an affiliate, we earn on qualifying purchases.

BONYCUST Foldable Drying Rack with 24 Clips for Drying Socks Lingerie Baby Clothes Drying Towels Rotatable Sock Drying Rack
1.【360 Degree Swivel Hook】Circular design (diameter 51 cm approximately), save more space while rotating or folded.
As an affiliate, we earn on qualifying purchases.
As an affiliate, we earn on qualifying purchases.