To make and use a simple plant press in the field, gather two flat boards or heavy cardboard, absorbent paper, and some rubber bands or straps. Collect fresh plants and carefully layer them between sheets of paper, avoiding overlaps. Place the layers between the boards, then secure tightly with your fasteners. Tighten as needed to apply even pressure for proper drying. Continue exploring the process to learn more tips for effective preservation and display.
Key Takeaways
- Gather flat, sturdy materials like thin wood or cardboard for the press base and top.
- Layer specimens between absorbent paper, avoiding overlaps, then secure with rubber bands or straps for even pressure.
- Assemble the press by placing layers between the boards and tightening fasteners to apply consistent pressure.
- Use the press immediately after collecting plants to ensure proper drying and shape preservation.
- Once dried, mount specimens on paper for display or study, making use of the press’s portability in the field.
If you’re interested in preserving plant specimens, making a simple plant press is an easy and rewarding project. It empowers you to document and celebrate the diversity of nature while maintaining control over your collection. A plant press allows you to carefully dry and flatten your specimens, making plant preservation both accessible and satisfying. With just a few basic supplies, you can create a device suited to your needs, whether you’re collecting wildflowers, leaves, or herbs in the field. The key is to design it for portability, simplicity, and effectiveness, so you can take it anywhere and preserve specimens as soon as you find them.
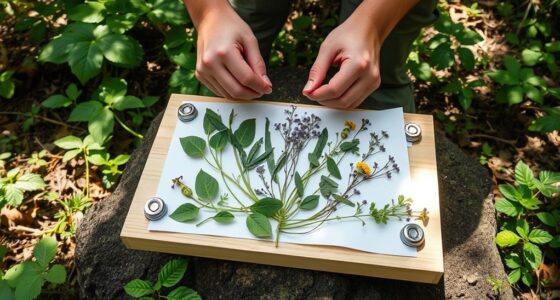
To start, gather some sturdy materials: two flat pieces of wood or thick cardboard as the base and top, some sheets of absorbent paper or cardboard for layering, and a way to secure everything tightly—rubber bands, straps, or even elastic cords work well. When assembling your plant press, place your specimens between sheets of paper, making sure they’re flat and free of excess moisture. This step is vital for proper plant preservation and prevents mold or decay. You want your specimens to dry evenly and retain their shape, which is why gentle pressure and proper layering matter so much.
Once your specimens are sandwiched between sheets of paper, position them between the two flat boards. Secure the layers with your chosen fasteners, tightening enough to apply consistent pressure but not so tight that it crushes the plants. As you tighten the straps or bands, remember that your goal is to create enough pressure for efficient drying and specimen mounting later. As you gain experience, you might explore different pressing techniques to optimize your results. The entire process should be straightforward, allowing you to focus on the joy of discovery rather than complicated mechanics.
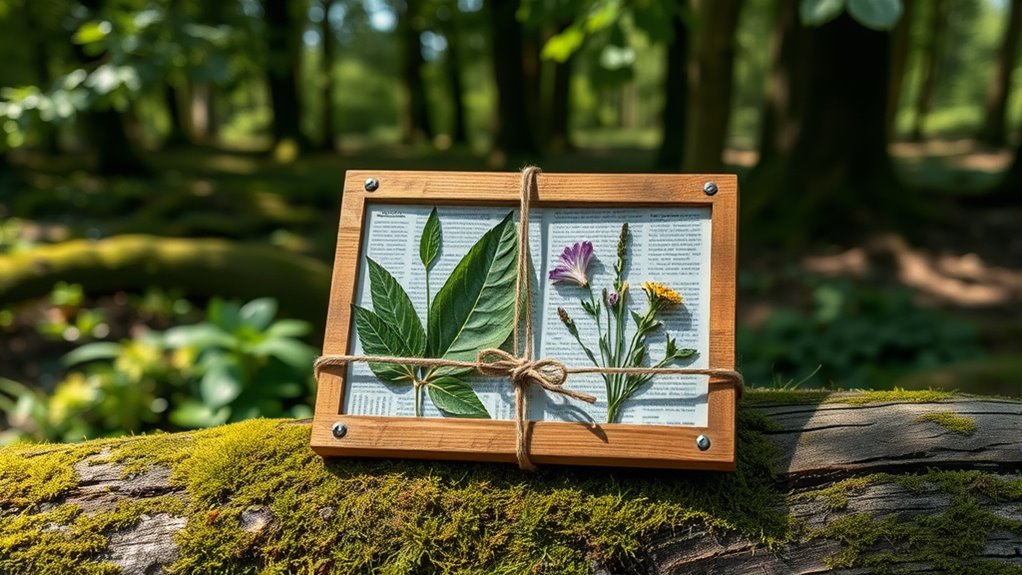
Using your simple plant press in the field offers liberation through hands-on engagement. You control the entire process, from collection to preservation, transforming a spontaneous find into a lasting keepsake. When you get back home, your dried specimens are ready for specimen mounting—an essential step that involves attaching them to paper or mounting boards for display or study. Proper plant preservation through pressing makes this step easier, helping you showcase your collection with clarity and purpose. Whether for personal enjoyment, education, or scientific study, your homemade press becomes a tool of freedom—freeing you from reliance on commercial products and allowing you to connect more deeply with nature’s treasures.

Aboofx Flower Press Kit, Craft Kits 11"x11" 10 Layers Wooden Flower Pressing Kit for Crafts Pressed Flowers & Plant Press for Spring DIY Craft Art, Preservation Kits for Bookmark Frame Flowers Drying
【10 Layers Extra Large Size Flower Press】: With an 11 x 11 inches large size, this flower press…
As an affiliate, we earn on qualifying purchases.
As an affiliate, we earn on qualifying purchases.
Frequently Asked Questions
How Long Does It Take to Properly Press a Plant?
It takes about one to two weeks to properly press a plant, depending on its thickness and drying time. Thicker plants need more time to flatten and dry completely, so check regularly. You’ll notice when it’s ready—plants become crisp and brittle. Remember, rushing this process can ruin your specimens, so give them enough time to dry thoroughly. Patience here guarantees your pressed plants stay beautiful forever.
Can I Reuse the Materials for Multiple Presses?
Absolutely, you can reuse the materials for multiple presses! Think of your press as a resilient champion, ready to serve countless times. By embracing material reuse, you’re championing sustainability practices that free you from waste and help protect the environment. Keep your press in top shape, and it’ll continue to liberate your botanical treasures, making every pressing adventure more eco-friendly and rewarding. Reuse is the key to sustainable exploration!
What Are the Best Plants to Press for Preservation?
You should press plants like ferns, wildflowers, and leaves with vibrant colors because they preserve well with proper plant identification and preservation techniques. Choose species that are easy to identify and hold their shape and color. Avoid thick, woody stems or plants with high moisture content, as they may not dry properly. By selecting the right plants, you can create a stunning, lasting collection that celebrates your freedom to explore nature’s diversity.
How Do I Prevent Mold or Decay During Pressing?
Did you know that proper mold prevention can increase your plant press’s lifespan by up to 50%? To prevent mold and decay during pressing, guarantee good airflow around your specimens and keep them dry. Use absorbent paper and change it regularly to control moisture. Avoid pressing overly damp plants, and store your press in a cool, dry place. These steps help you liberate your collection from decay and preserve it longer.
Is a Homemade Press as Effective as a Commercial One?
A homemade press can be just as effective as a commercial one if you use DIY alternatives that suit your needs. You’ll save money with a cost comparison that favors homemade options, giving you the freedom to experiment and explore without breaking the bank. With proper construction and care, your DIY plant press will allow you to freely gather and preserve specimens, empowering your botanical adventures.

Forestry Suppliers Plant Press Straps – Set of 2 Adjustable Spring Buckle Straps, 1″ x 84″ – Durable Securing Straps for Herbarium & Botany Plant Presses
Heavy-Duty Polypropylene Webbing – Reliable, rugged material stands up to repeated use in field or classroom environments.
As an affiliate, we earn on qualifying purchases.
As an affiliate, we earn on qualifying purchases.
Conclusion
Now that you’ve built and used your simple plant press, you’re like a gardener wielding a magic wand, transforming fresh specimens into timeless treasures. Your newfound skill turns fleeting blooms into preserved memories, allowing nature’s art to linger long after the flowers fade. With patience and care, you’ve unfastened a gateway to explore plant diversity and deepen your appreciation for the natural world. Keep pressing forward—each specimen is a story waiting to be told through your hands.

TTUGTTUG Flower Press Kit for Adults, 11" x 11" Large Wooden 10-Layer Press for DIY Floral Art, Wedding Flower Drying, Great Gift for DIY Flowers Lovers
【10 Layers Flower Pressing Press】Specially designed for preserving flowers, leaves, and other plant materials, the large 11 x…
As an affiliate, we earn on qualifying purchases.
As an affiliate, we earn on qualifying purchases.

Aboofx Mini Flower Press Kit for Small Flowers Drying, Beginners-Travel Outdoor, Presses Plant, Leaves, Herbs, Micro Flowers, 2.5 x 4 Inch Pocket Pressed Flower Kit for Classroom, Arts Craft Lovers
【Effortless Flower Press Design】: Simply layer blooms between pressing boards! This flower preservation kit delivers vibrant pressed flowers…
As an affiliate, we earn on qualifying purchases.
As an affiliate, we earn on qualifying purchases.