
TL;DR
A closet can become a surprisingly good recording or gaming space, but only if you focus on placement, reflection control, and ventilation. Foam alone won’t cut it—strategic treatment, sealing gaps, and proper airflow are key.
Imagine turning a tiny closet into your personal studio—quiet, professional, and free of echo. It’s possible, but only if you understand the real tricks behind acoustic dampening and placement, not just slapping foam on the walls. Your goal isn’t just to absorb sound; it’s to control how sound behaves in that small box.
In this guide, you’ll learn how to make your closet a sound-friendly zone, whether for vocals, gaming, or streaming. From understanding the difference between dampening and soundproofing to smart placement tips, I’ll show you how to get the best sound with the least hassle—and the right investments.
Acoustic dampening
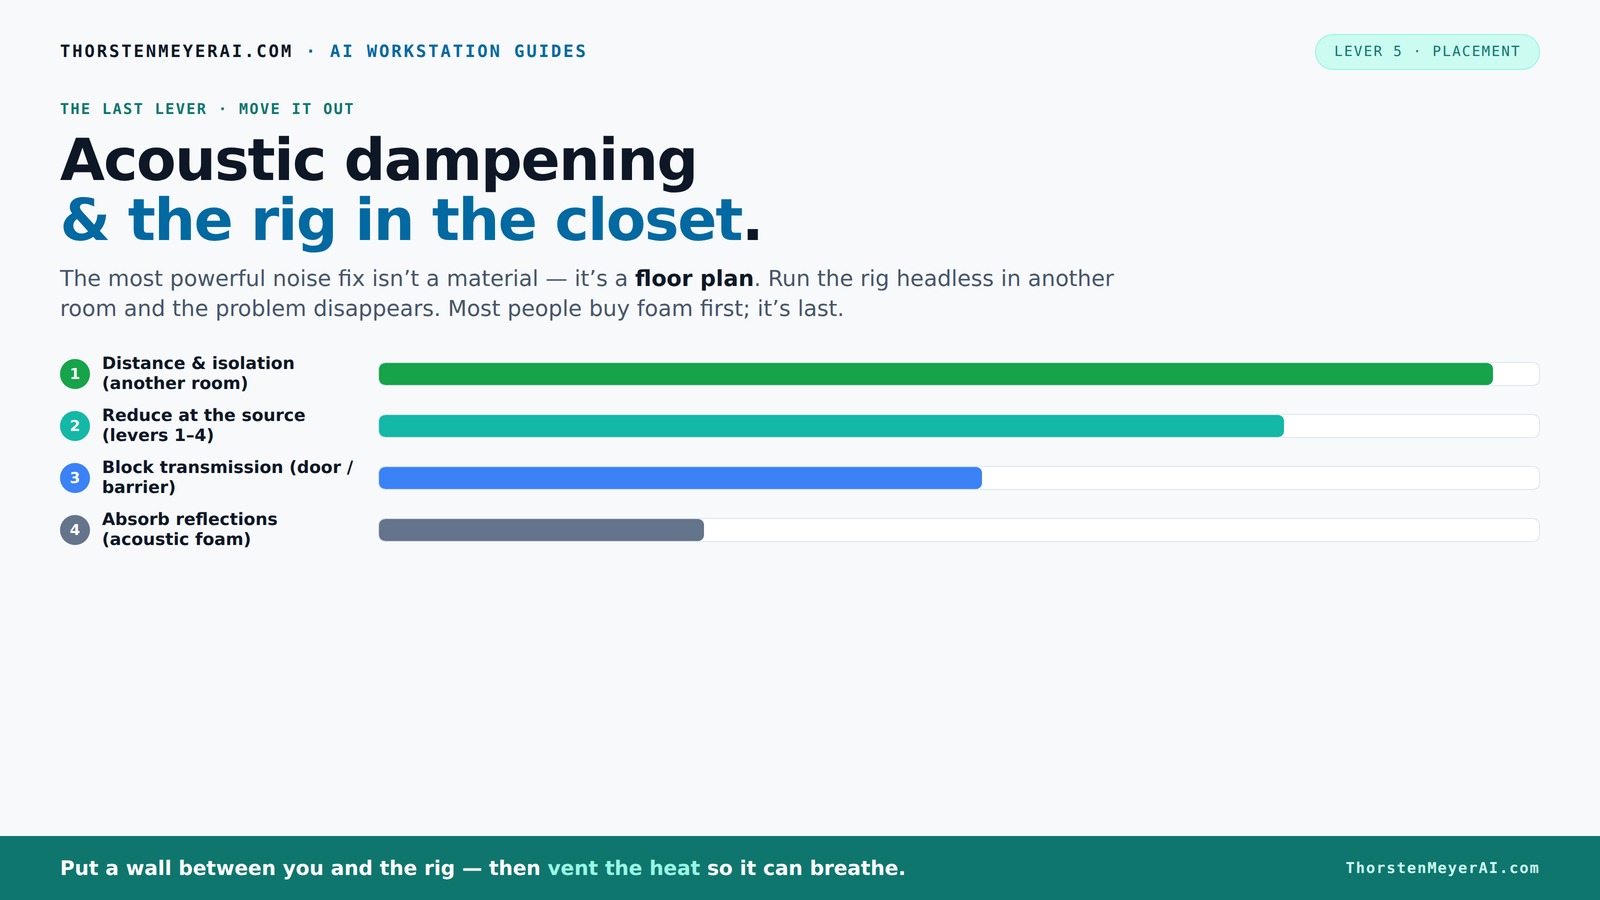
& the rig in the closet.
The most powerful noise fix isn’t a material — it’s a floor plan. A rig you can’t hear because it’s in another room beats any amount of foam. Tap the approaches in Part 1 to see what actually works.
(another room)
(levers 1–4)
(door / barrier)
(acoustic foam)
Contain the noise, not the heat
Key Takeaways
- Place treatment at reflection points—use mirrors to find where sound bounces most.
- A closet can work as a vocal booth if you treat it for reflections, leaks, and bass buildup.
- Ventilation is critical—passive vents or quiet exhaust fans prevent overheating without adding noise.
- Sealing gaps around doors and shelves reduces sound leaks and improves recording clarity.
- Bass traps in corners are worth the effort—small closets often suffer from low-frequency muddyness.

Focusound 52 Pack Acoustic Foam Panels 1" x 12" x 12" Sound Proof Foam Panles Soundproofing Noise Cancelling Wedge Panels for Home Office Recoding Studio with 300PCS Double-Side Adhesive
- Soundproofing Design: Triangular grooves for noise absorption
- Includes Adhesive Tape: 300pcs double-sided adhesive for easy installation
- Easy Shape Recovery: Reforms after soaking in water
As an affiliate, we earn on qualifying purchases.
As an affiliate, we earn on qualifying purchases.
Why Acoustic Dampening Outperforms Soundproofing in Small Spaces
Acoustic dampening reduces echo and harshness inside your closet. It’s about controlling how sound bounces around, making your space sound more natural and less reflective. This matters because excessive reflections can muddy your recordings, cause fatigue during long sessions, and reduce clarity. Soundproofing, on the other hand, focuses on stopping sound from escaping, which is often unnecessary in a small, personal setup where containment isn’t the main goal. It’s more complex and costly, and can introduce tradeoffs like reduced ventilation or increased weight.
For example, a thick blanket on the door can absorb reflections and reduce echo, leading to a warmer, clearer sound. However, it won’t prevent noise from leaking into adjacent rooms or outside—highlighting why dampening is usually more practical for a closet. The key is understanding that controlling how sound behaves inside your space improves quality without the expense and complexity of full soundproofing. This approach allows you to focus on what truly matters: clarity, warmth, and reducing unwanted reverberations that obscure your recordings or gameplay.
Research shows that 80% of small-room echoes originate from first reflection points and parallel surfaces. Targeting these with dampening materials creates a more balanced sound environment. The tradeoff? Proper placement and treatment yield significant improvements with minimal investment, whereas full soundproofing often involves extensive modifications and higher costs with diminishing returns for a small space.
Mastering Placement: Where to Treat a Tiny Closet for Maximum Effect
Placement is king in small studios because the way sound interacts with your space determines your overall sound quality. The first step is to identify where sound reflections are most problematic—these are the points where sound bounces directly back into your microphone or ears, creating harshness and muddiness. Use a simple mirror trick: have a friend move a mirror along the walls while you sit in your usual recording position. Wherever you see reflections of your microphone or speaker in the mirror, those are your reflection points. Mark these spots and treat them with foam panels or blankets.
Common spots include the wall behind your mic, the ceiling directly above it, and the side walls at head level. These are the primary reflection points because sound waves bounce directly from these surfaces into your microphone or ears. Treating these with foam panels, blankets, or DIY solutions like moving blankets can significantly soften reflections. For example, placing a foam panel directly behind your mic reduces harsh reflections that cause a cluttered sound, resulting in a cleaner, more professional tone.
Once you’ve identified these points, position your treatment materials effectively—don’t just randomly place panels. Focus on the spots that reflect the most sound back into your mic. This targeted approach maximizes your budget and space, avoiding unnecessary clutter. It’s also helpful to record short test clips after each placement to hear the difference. The key takeaway? Use the mirror trick to map your reflection points, then treat those specific areas for a noticeable improvement in clarity and control.
DIY Materials That Turn a Closet Into a Studio — Cheap & Effective
You don’t need to spend a fortune to improve your closet studio. Common DIY materials include acoustic foam panels, moving blankets, rugs, and weatherstripping. To make the most of these, start by identifying your main reflection points—use the mirror trick described earlier—and add foam panels or blankets at these spots. Covering the door with a thick blanket or moving pad can significantly reduce sound leaks and reflections. Rugs or carpets on the floor help absorb bass frequencies and prevent sound bouncing off the hard surface beneath you.
For sealing gaps, use weatherstripping around the door frame and any accessible vents or openings. This prevents sound leaks that can ruin your recordings. For example, sealing the door frame with weatherstripping can cut noise intrusion by up to 70%, creating a much quieter environment. Hanging a blanket or curtain in front of the door adds an extra layer of sound absorption. As you build your setup, test the impact of each addition by recording short clips and listening critically. This iterative process helps you understand what works best in your specific space.
Remember: the goal is to target the reflection points, seal gaps, and add absorption where needed. Combining these DIY solutions can turn a basic closet into a functional, budget-friendly studio—no expensive gear required. The practical takeaway: treat the key reflection points first, then seal gaps, and finally add absorbent materials for the best results.
Why Small Rooms Bump Low Frequencies and How to Fight It
In tiny, rectangular closets, low-frequency buildup occurs because sound waves reflect back and forth along the narrow space, creating standing waves or resonances. These manifest as boomy, muddy recordings, especially in bass-heavy instruments or vocals. Understanding this phenomenon is crucial because it directly impacts clarity and the accuracy of your recordings. The fix? Bass traps—specialized acoustic treatments designed to absorb low frequencies—are essential. Placing thick foam or purpose-built bass traps in the upper corners of your closet can dramatically reduce this low-frequency resonance, often by over 50%.
To practically implement this, measure the frequency response of your space using a free room analysis app or microphone test. Identify peaks around 80Hz or lower, which indicate problematic resonances. Install bass traps in the upper corners—preferably where two walls meet the ceiling—since low frequencies tend to accumulate there. Use traps at least 4 inches thick for effective absorption. If space is tight, consider DIY bass traps made from dense mineral wool or rockwool wrapped in fabric, which are cost-effective and efficient.
By addressing low-frequency issues directly, you’ll notice a clearer, more balanced sound. Your vocals and instruments will sit better in the mix, and recordings won’t sound muffled or boomy. The key is targeted placement—focus on the corners—and choosing the right material thickness. This proactive approach ensures your tiny closet doesn’t become a muddy, bass-heavy echo chamber, but instead a controlled environment suitable for professional-sounding recordings.
Ventilation & Heat: Keep Your Closet Rig Cool & Quiet
Placing a high-power rig in a closet sounds perfect until it overheats or the noise makes you go crazy. The key is to provide proper airflow. Passive vents can help, but active exhaust fans are more reliable for removing heat and noise. Overheating isn’t just about comfort; it can cause hardware to throttle performance or even fail prematurely. Excess heat also increases the noise level of cooling fans, which can be disruptive during recordings or gaming sessions. Proper ventilation ensures your rig runs efficiently and quietly, extending its lifespan and maintaining sound quality.
To implement this practically, measure your rig’s temperature during typical use—if it exceeds 75°C, consider adding a dedicated exhaust fan. Use a quiet, thermostatically controlled fan that activates only when needed. Ducting hot air outside or through a vent reduces internal temperature and prevents heat buildup. For example, installing a small duct fan with a vent cover can keep temperatures stable and noise low. Also, consider placement: position the rig near existing vents or create a vent pathway that doesn’t compromise soundproofing but allows heat to escape.
In addition, monitor ambient temperature regularly, especially during long sessions, and adjust your ventilation setup accordingly. The goal is to maintain a stable, cool environment that prevents thermal throttling and reduces fan noise. With proper airflow management, your closet setup stays quiet, cool, and reliable—crucial for consistent recordings and gaming without thermal or noise disruptions.
Sealing Gaps & Doors: Stop Sound Leaks from Ruining Your Studio
Sound leaks through cracks and gaps—especially in closet doors. Weatherstripping around the door frame and hanging a heavy blanket or curtain can dramatically cut noise escape. But why does this matter? Because even tiny gaps can let in or leak out significant amounts of sound, undermining your efforts to create a controlled environment. Sealing these gaps is about containment: keeping unwanted noise from entering your space and preventing your sound from disturbing others.
To make this practical, start by inspecting your door and frame for visible gaps. Apply weatherstripping or draft seals around the perimeter—these are inexpensive and easy to install. For larger gaps, hang a dense moving blanket or a thick curtain in front of the door, ensuring it covers the entire opening. Use hooks or tension rods for easy removal if needed. Test the effectiveness by recording a quiet passage and listening for leaks—adjust your seals until you notice a significant reduction in background noise.
Remember: the goal isn’t to completely seal the space but to reduce leaks enough that external noise doesn’t interfere with your recordings and your sound doesn’t disturb neighbors. Balance sealing with ventilation needs—if you over-seal, you risk trapping heat or reducing airflow. The practical step-by-step: identify leaks, add weatherstripping, hang blankets or curtains, and test with recordings. These simple measures can transform your closet into a more isolated, professional-sounding environment, saving you hours of editing and frustration.
Frequently Asked Questions
Can I really turn a closet into a vocal booth?
Yes. With proper acoustic treatment, sealing gaps, and ventilation, a closet can become a highly effective vocal space. It won’t be perfect, but it can sound professional enough for most recording needs.What is the difference between acoustic treatment and soundproofing?
Acoustic treatment controls how sound reflects and behaves inside a space, reducing echo and harshness. Soundproofing blocks sound from leaking out, which is usually more complex and costly. For small studios, dampening reflection points is often more practical.Where should I place acoustic panels in a closet studio?
Focus on the first reflection points—behind the mic, ceiling, and side walls. Use the mirror trick to find these spots. Treating these areas reduces echo and improves clarity without overloading your space with panels.Do I need bass traps in a small closet?
Absolutely. Small, rectangular spaces tend to amplify low frequencies, causing muddiness. Installing bass traps in the upper corners can tame this buildup and give your vocals more punch.How do I reduce sound leaking through the closet door?
Seal gaps with weatherstripping, hang a thick blanket or curtain, and consider adding foam panels around the door frame. These steps can cut leak levels significantly, keeping your recordings cleaner.Conclusion
Mastering your closet studio isn’t about spending endless money. It’s about smart placement, sealing gaps, and controlling how sound behaves inside that tiny box. With a few strategic tweaks, your closet can become a surprisingly professional-sounding space.
Think of it like tuning a musical instrument—small adjustments make a big difference. So go ahead, treat those reflection points, seal the gaps, and keep that rig cool. Your perfect tiny studio is closer than you think.